

How To Repair Holes In Cargo Trailer
The Cameo Camper Renovation: Repairing holes in aluminum exterior walls + prepping for paint
So. many. holes. Little holes, large holes. Skinny holes, fat holes. Round holes, ragged holes, wonky holes. If you can think of it, we had it. Some were intentional and functional – used for water and electrical connections, etc. Others were mysterious gashes and tears, no doubtfulness collected on The Cameo's many adventures. A lot, however, were made by us from that fourth dimension we had to triage the camper then it wouldn't come crashing down. Regrettable, only virtually importantly, repairable. All in all they added upwards to at least 128 holes (yes I counted, and I know I missed some). Instead of replacing the entire camper skin to make it watertight (which would definitely expect fabled, just is expensive and if we did that nosotros figured we should've just built a new camper entirely from scratch), we opted to save the original metal exterior and repair the holes using various methods depending on the size, type and location.
I know she'due south already all painted, and nosotros kind of touched on this way back in August, but we repaired holes for so long and did so much more pigsty work since that post, that I felt this topic warranted some other one with more details and tips for anyone attempting to practise the same matter. Plus, a number of you have asked for details and I'm so happy to oblige!
For starters, exercise not fear – if nosotros tin do this, yous can too! A lot of the holes were very sloppily plugged upwardly with caulk or silicone or hot glue – about unattractive, some working better than others since there were still leaks all over this beast. It was a large ol' hot mess that required a lot of caulk remover and scraping. A lot of the holes were incognito and don't really show up in the very start photos we shared after nosotros picked her upwardly, only trust me they were there laying in wait…
The innies & outies of hole prep
Later on nosotros removed caulk for days, we assessed what each hole needed, mostly based on its size. Ane thing to keep in heed is if your metal hole is poking "outward" then that you have lilliputian metal burrs, yous'll desire to carefully push them so that the edges of the hole pull in. In our case, when we removed all of the screws we'd put into the walls, information technology pulled the metal a petty creating what I'll call an "outie" abdomen button. In the case of patching holes, we found an "innie" works better. You lot can see what I'm talking about below.
In the outie photo on the left you can run into the metal burrs effectually the holes, compared to how smooth the edges look afterward nosotros made them innies in the photograph on the correct. (The larger band y'all see around the holes on the left were made by the foam washers on the Teks screws we used. They are slightly indented into the metallic.)
We turned our outies into innies past using a combination of a flathead screwdriver and a pair of needle nose pliers. And lots of muscle. And grunting. I'thousand pretty certain I was grunting. I'g not gonna sugarcoat it – this part sucks. It takes a fair amount of mitt strength and precision to move the metallic without slipping and scratching the metallic up or stabbing yourself. (No one's perfect – if you skid and scratch your aluminum a little you tin always sand information technology out with fine sandpaper before painting and no i will be the wiser.) I recommend wearing gloves to help cushion your hands and protect them against the metallic but in example you lot slip. Our technique was to get-go with the screwdriver to fold over any extra pokey bits every bit much equally possible, then use the closed tapered needle nose end of the pliers to pull the hole inward by sticking it in the pigsty and kind of swirling it around. (Not sure in that location's a better way to say that, then insert joke here.) Even though information technology takes a little while and makes the hole a fiddling bigger, this step gets y'all a smoother finish when y'all go to sand later, non to mention is safer when you're applying the putty by hand since you lot're non poking yourself with metal burrs. One time they're all turned inward, you're ready to fill.
Pocket-size holes (about 1/4" in diameter or less)

Small holes in the process of beingness filled with JB Weld Water Weld
Tools for the job:
-
JB Weld Water Weld Epoxy Putty
-
Disposable gloves
-
Electrical sander + varying grits of sandpaper (we used 80 - 240)
I'm pretty sure JB Water Weld Epoxy Putty was invented by some kind of wizard. This stuff is amazing. Co-ordinate to their website, "WaterWeld will plug or seal leaks and patch holes and cracks in almost annihilation. Ideal for repairing plumbing, fuel tanks, tub and shower, drains, pool and spa, boats and potable water tanks; setup occurs even nether water. Later curing, it can exist drilled, tapped, filed, sanded and painted. WaterWeld has a set up time of 15-25 minutes and sets hard in one hour. WaterWeld cures to an off-white color, is rated at a tensile force of 900 PSI and will withstand temperatures up to 300ºF." Swell for:
-
Plumbing, Tub, Shower & Drains
-
Fuel Tanks
-
Marine & Boats
-
Drinkable Water Tanks
-
Vintage aluminum campers! (alright, I added this i, but it does say "metal")
Nosotros went through I'm guessing nigh seven sticks of this stuff over the form of this portion of the renovation. What'south great about JB Water Weld is it's very piece of cake to work with, waterproof, paintable and sets up pretty fast and so yous can get information technology applied pretty chop-chop. That existence said, considering it starts to harden quickly in one case mixed, it'south best to work with pretty small amounts. It looks similar a little putty log (maybe nigh 4" long or so) and is made up of two parts – a grey colored inner core and a white outer part. I don't know what exactly information technology is, simply you have to mash the two parts together to activate the stuff. Yous'll know you're doing it correct because it gets warm (not hot enough to burn yous or anything) and the two colors should mix to brand a uniform light gray color.
Wearing disposable gloves, I found information technology best to unwrap it from the plastic, and just suspension off a small amount (maybe near 1/2-3/4" or then), making certain to intermission off the end in a straight line and so y'all go the right amounts of the cadre and outer parts. Squish it with your fingertips (wearing disposable gloves!) until it'due south warm and the color is mixed thoroughly. Then speedily use your glob of putty on top of and across the edges of your hole, which should ever be a clean, dry out area. At first I tried to nicely feather the edges off and flatten the top as much as possible to help with waste product and minimize sanding later on. Doing this sometimes meant I hadn't put enough JB Weld on and after sanding I had a petty dimple where it was even so low and I had to go back for some other repair. Skilful news is you can layer this stuff if needed to get just the correct tiptop and look you need.
After information technology set, I sanded the sloppy lumps down getting finer and effectively with my dust each time until I was happy with the smoothness and how the edges feathered into the surrounding aluminum. I thought information technology sanded better the next day or longer out later on application. In our experience we knew we'd tried to sand it too shortly when the top started turning a weird dirty grayness color, virtually like it was just burning/melting a little or something. Occasionally I would sand the stuff too sparse (for the size of the hole I guess), and the vibration from the sander would rattle the JB Weld right out of the screw pigsty I'd but patched. A total bummer, only I'd but layer on top. Sometimes with more JB Weld, and sometimes I'd endeavor something else…
Large holes (1" or and then in diameter & upward)
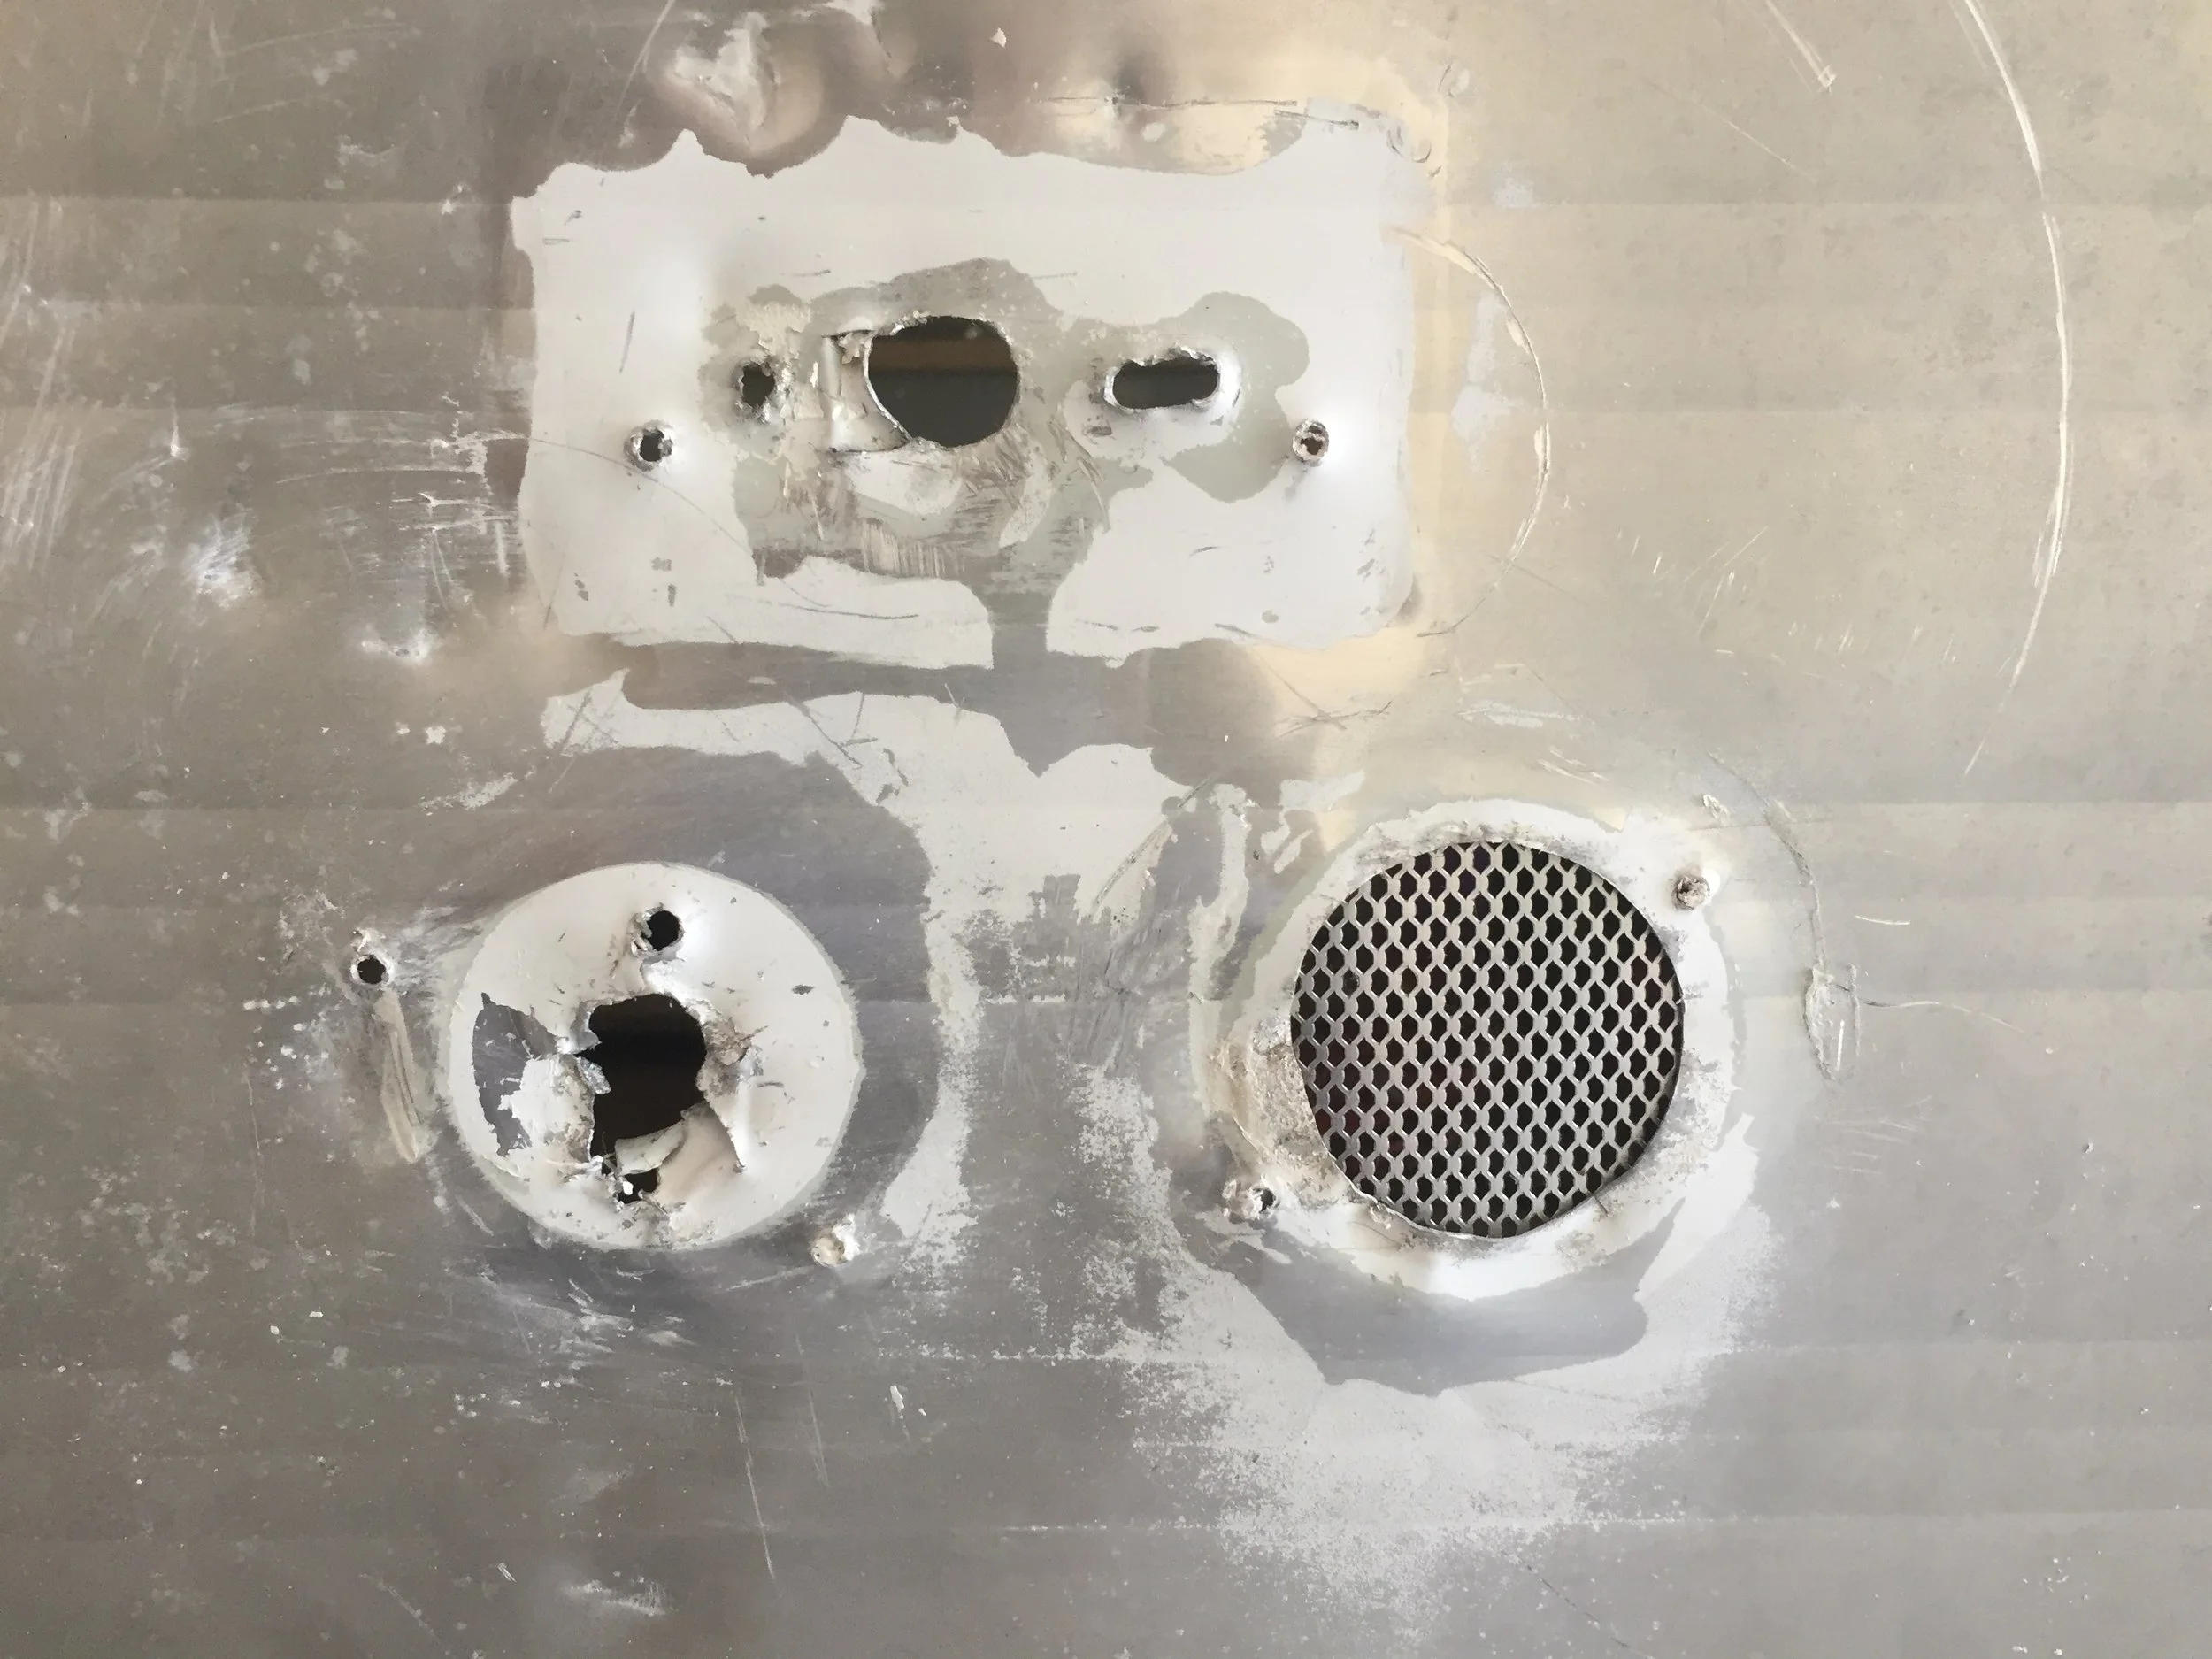
Big holes – the one on the right is shown with the Bondo self adhesive patch in place backside information technology.
Tools for the job:
-
Bondo – we used both stranded and not-stranded
-
Bondo self-adhesive patch (or sheet metallic) and then the Bondo has something to grip to
-
Duct tape (possibly)
-
Plastic spreader(southward)
-
Dispensable gloves
-
Not-porous surface for mixing Bondo
-
Electric sander + varying grits of sandpaper (we used 80 - 240)
Bondo. This stuff is kind of a mess. Okay, really a mess, but information technology does make for such a nice finish it makes the scent, await and mess worth it. Not knowing which would be better for the states, we bought and tried both the stranded fiberglass and non stranded metal-infused types. They both worked well, merely I'd recommend the non-stranded. It was less messy, stunk way less and was easier to use overall. Follow the instructions on the containers for your hardener ratios and mixing techniques – they're strange simply they're of import. The stranded seemed to harden up quicker, and (wearing disposable gloves) I mixed and applied it by mitt smearing it around as needed. Like the JB Water Weld, this gets warm to the bear upon every bit the hardener is activated.
The non-stranded Bondo was mixed and applied with a plastic spreader which fabricated it easier to shine as I went. This one also sets up very rapidly and then resist the urge to smooth it too much because it will merely make it uglier and more than textured. Trust me. Because it goes on with a spreader, I was able to more easily mimic the striped texture of our camper by kind of scoring/waving the plastic spreader equally I was applying information technology.
Once cured, I sanded these patches down using finer and effectively grits as I went.
For the patch above we added and sanded a layer of non-stranded Bondo in between photos three and iv.
For very large holes that need some kind of backing, utilise the Bondo metal self-adhesive patch (or a scrap of sheet metallic glued to the behind of your hole, like we did for the front end of our camper). The patch is meant to be cutting to size, if needed, and is supposed to stick to the surface you're patching. For some reason ours didn't. Thankfully we applied ours on the inside of the camper for a smoother end, so we used duct tape from the dorsum to help keep the patch in place. Fume and mirrors, y'all.
Tiny holes (pinholes much smaller than 1/iv" in bore) & fine tears

Tools for the job:
-
JB Weld H2o Weld Epoxy Putty
-
Bondo – we used both stranded and non-stranded
-
Plastic spreader(s)
-
Non-porous surface for mixing Bondo
-
Dispensable gloves
-
Electrical sander + varying grits of sandpaper (we used fourscore - 240)
They may exist small and unassuming, simply we've found the smaller the hole, the harder it is to patch. These are the ones when equally you're sanding, the filler is nearly probable to jiggle and wiggle and somehow fall out. In many of our "trouble areas" where the metal was riddled with tears, baby holes and those weird fuzzy looking worn holes all correct next to each other we used a multi-faceted approach, combining all the techniques used in the sections above. When in doubtfulness, fill it, sand it, and then fill up and sand information technology again a few more times. At that place may exist a better way to do this, just we but had to layer and layer and layer filler in these areas since we had but near everything happening in the span of a human foot or and so.
An added layer of waterproofing, just in case
We think these areas are all watertight, but every bit an actress measure we will be rounding back to all of our previously leaky areas with a bottle (or two) of Captain Tolley's Creeping Crack Cure. We don't want all of this hard work to be for nil, so if a tiny bottle of phenomenon sealant is enough to push us over the waterproof edge, we are all in!
It "finds and fixes mystery leaks without having to accept everything apart. It is a one-office water-based acrylic co-polymer penetrating sealant. The Creeping Fissure Cure is so thin that using capillary activity information technology can find its mode correct inside fine seams and joints to prepare to a clear flexible seal. It is a totally different approach than most sealants. Being thinner than water, it goes where the h2o goes. It can find its way correct into hairline cracks and hair-thin seams where other sealants cannot reach. It traces mystery leaks. The rapid absorption of the sealant into the seam indicates the potential leak. Fifty-fifty excellent conventional sealants cannot practise that. It's quick and easy to apply, too. There's no need to remove former sealants. You but apply the sealant forth the line of a cleft or joint until no more is absorbed. As an added benefit, information technology's water-based and non-toxic. The sealant is prophylactic to use and, different other products, information technology can exist applied to cracks even when they are slightly damp. When dry the sealant is transparent just information technology can be painted over successfully equally so niggling of the sealant is exposed to the surface."
After Helm Tolley'south, we'll be calculation a sparse bead of silicone to the seams equally well. This may all exist overkill, just then again if it keeps us from having whatsoever more than h2o harm, it volition have all been worth it.
Removing pigment + sanding imperfections

Tools for the chore:
-
Electric sander + varying grits of sandpaper (we used 80 - 240)
This step was the easiest for united states paint prep-wise. The Cameo was generally blank and really only had the golden stripe on it. The golden paint was in pretty good shape in that it wasn't chipping, but when I started running our electrical sander over it, it did starting time to kind of bit off a little. I probably didn't have to sand off quite as much as I did, but my inner OCD monster got a tiny flake carried abroad. That being said, yous can come across from the photo above nosotros didn't get every speck of gilded off. Instead, nosotros only made sure the loose bits came off and everything that was left was smooth and primer-prepare.
If you have a few holes to patch, don't worry. You tin can fix it. Just expect at how many patches we had just a couple weeks ago (at to the lowest degree 128), compared to now. What holes?
She'due south non perfect, but this erstwhile gal has seen some things in the last one-half a century.
Make that 129 holes…
Since I started writing this/after we painted the exterior, I accidentally screwed a Kreg screw through the exterior of the camper skin when trying to add a piece of wood to the inside of the left rear area.
::: facepalm :::
So, for now I have at least one more pigsty to patch. Everything's fine; nothing is ruined. We'll just add together it to the listing.
What practice you think? Any questions for the states? Suggestions on what you'd like to encounter?
For the latest on The Cameo – plus pictures of our pups and another shenanigans – don't forget to follow u.s. on Instagram. Nosotros're getting then close to moving to the inside I tin near taste information technology!!
Other Posts Y'all Might Like

Source: https://loneoakdesignco.com/blog/2019/01/07/the-cameo-camper-renovation-repairing-holes-in-aluminum-exterior-walls-prepping-for-paint
Posted by: guzmansevenjoy.blogspot.com
0 Response to "How To Repair Holes In Cargo Trailer"
Post a Comment